Update time: January 17, 2025
If you’re looking to track logged-in users across devices in GA4, you’ve probably heard about the User ID feature. The idea is simple: assign a unique identifier to each user, and GA4 will stitch their sessions together across phone, tablet, and laptop.
The problem is, setting it up isn’t as straightforward as flipping a switch. You need to get the ID from your site, hash it to avoid PII issues, pass it to GA4 through GTM, and — optionally — register it as a custom dimension so you can actually see it in reports.
If my guess was correct, you have come to the right place. In this article, I’ll walk you through the entire setup from start to finish.
Configure User ID in GA4
Step 1: Get the User ID
Before you can send a User ID to GA4, you need to capture it from your site after a user logs in. There are several ways to do this in GTM, and each has its tradeoffs.
- Option 1: 1st Party Cookie:After login, store the user’s email (or any identifier) in a cookie, then use a 1st Party Cookie variable in GTM to read it. The downside: if cookies are blocked or cleared, the User ID is lost.
- Option 2: JavaScript Variable:After login, store the identifier in a JavaScript variable on the page, then use a JavaScript Variable in GTM to read it.
- Option 3: Data Layer Variable:After login, push the identifier to the data layer using dataLayer.push(), then use a Data Layer Variable in GTM to read it.
My recommendation: JavaScript Variable. It’s reliable, doesn’t depend on cookie policies, and is straightforward to implement. Here’s the code you need to add to your site (on all pages after login):
window.user_id = "[email protected]"; // Replace with actual user identifier
GA4 does not allow sending personally identifiable information (PII). So you should never send a raw email address or username as the User ID. Instead, hash it.
For example, if my email is [email protected], its MD5 hash would be something like c046f9efa4a3d9c5bc14a2a56f870933after. That’s what you should send.
So the actual code on your page would look like:
window.user_id = "c046f9efa4a3d9c5bc14a2a56f870933"; // Hashed valueNote: This code needs to be present on all pages after login, not just the login page.
Now, in GTM, click 「Variables」——「New」——「Choose a variable type to begin setup…」——「JavaScript Variable」 then name it “User ID”, and configure as follows:
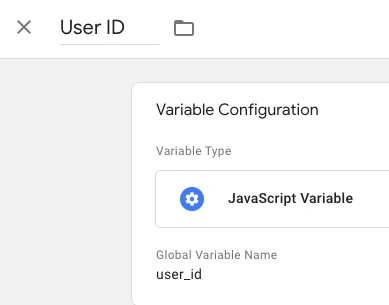
That’s it. GTM will now read the user_id JavaScript variable on your page.
Step 2: Set the User ID in Your GA4 Configuration Tag
Now that the variable is ready, you need to pass it to GA4.
Open your GA4 configuration tag (the one that sends the page_view event). In the Configuration settings, add the user_id field:
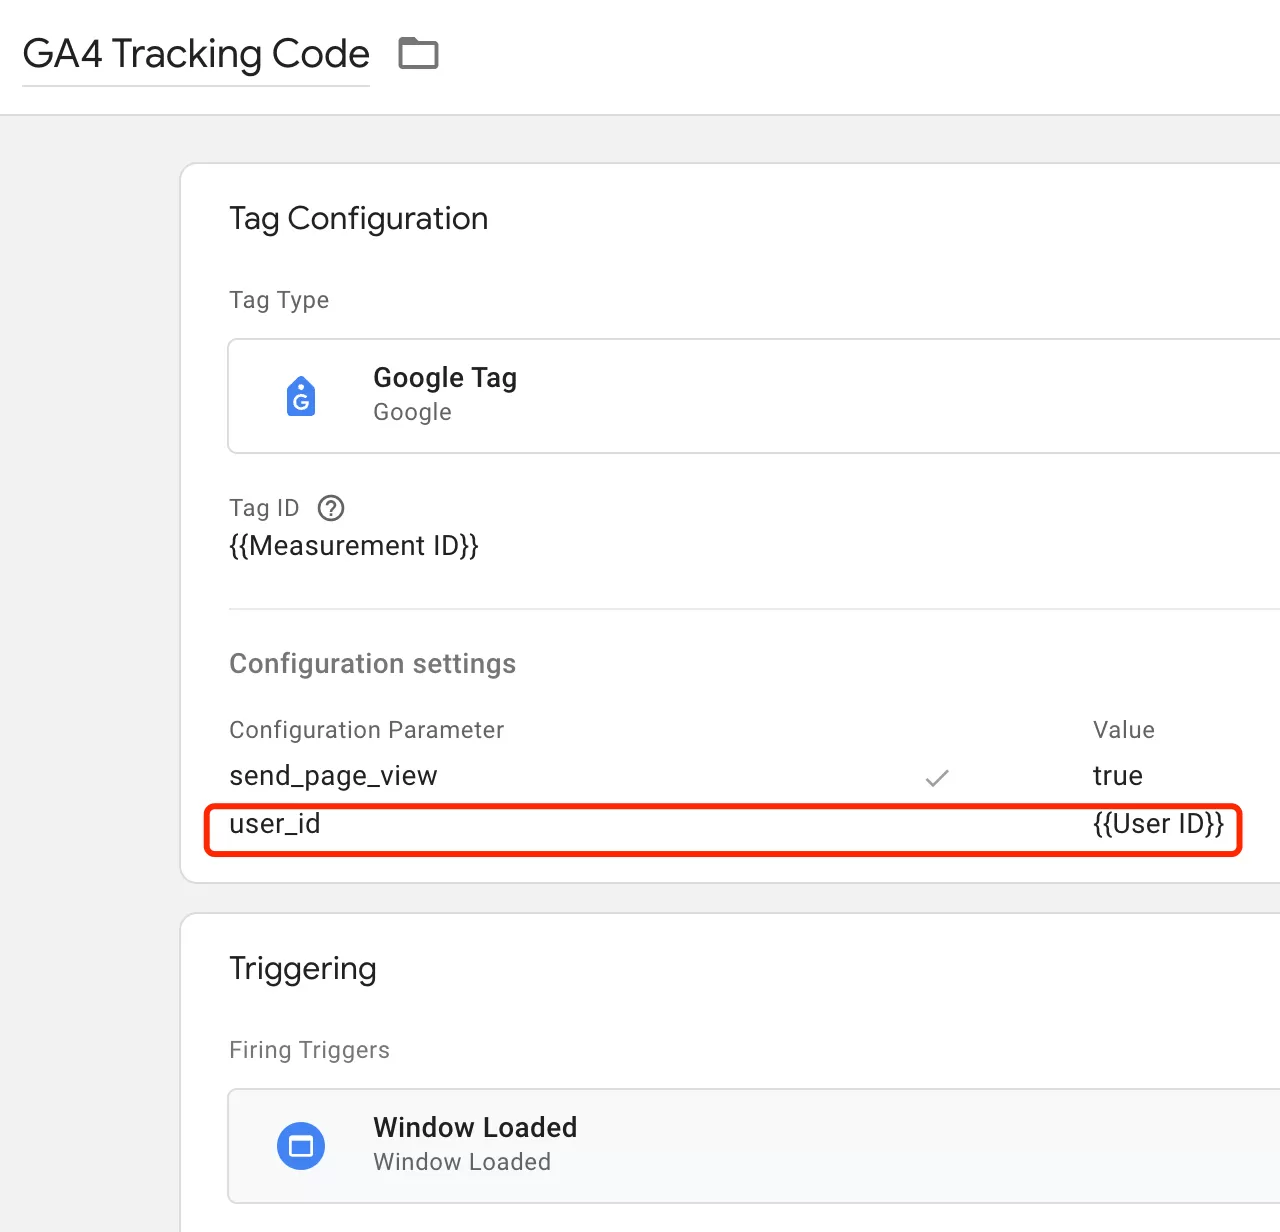
This tells GA4 to use the value from your JavaScript variable as the User ID for that user’s session.
Step 3: Preview and Release
Click Preview in GTM and load your site, Log in (or simulate a logged-in state), Verify that user_id contains the correct hashed value
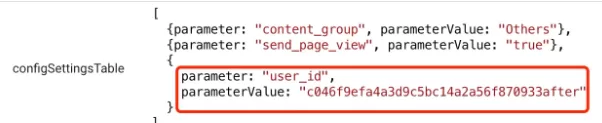
If everything looks good, publish the container.
Register User ID as a Custom Dimension (Optional)
The user_id field in the configuration tag handles cross-device tracking behind the scenes. But if you want the User ID to appear as a dimension in your GA4 reports — so you can filter by it, segment by it, or use it in Explore — you need to set up a custom dimension.
This is completely optional. If you only need cross-device session stitching, skip this section. If you want to see actual user identifiers in your reports, read on.
Step 1: Create an Event Settings variable in GTM
In GTM,click「Variables」——「New」——「Choose a variable type to begin setup…」——「Google Tag: Event Settings」,name it “Common Event Parameter”, and configure as follows:
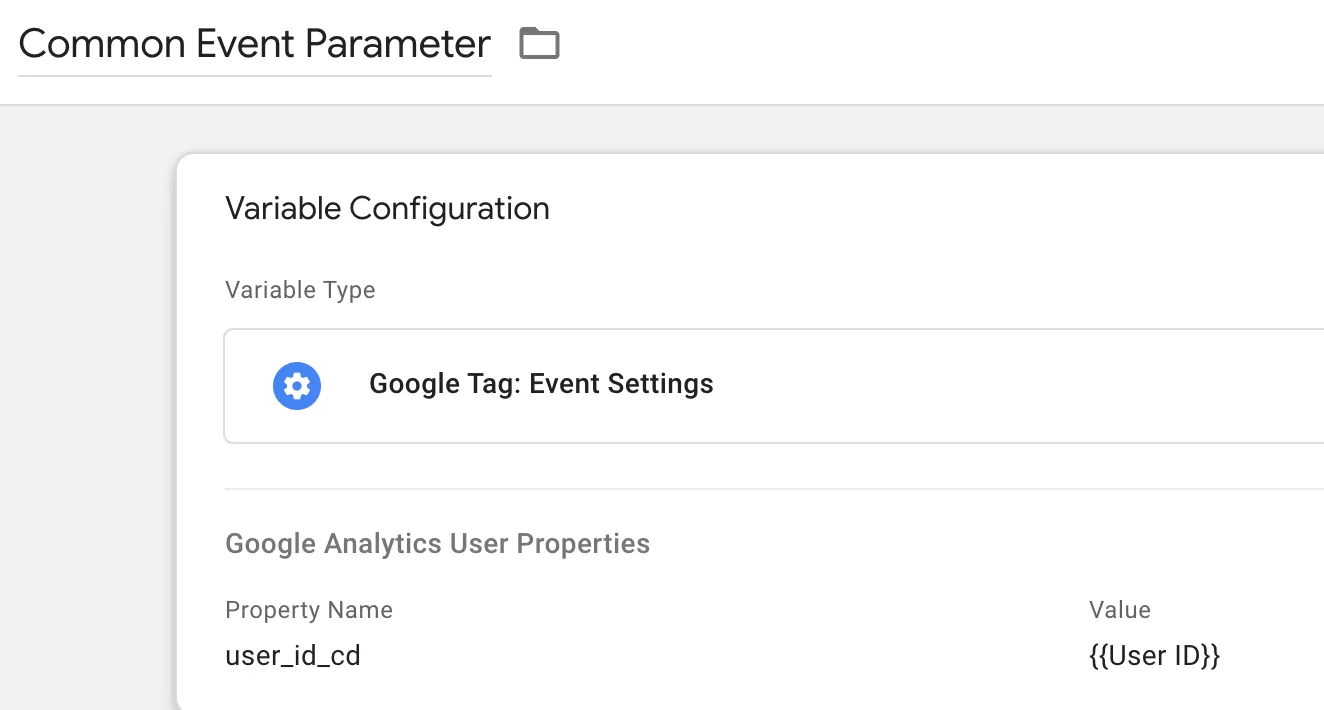
If you already have an Event Settings variable in your container, just add the user_id_cd property to the existing one.
Step 2: Apply it to your GA4 tag
Go back to your GA4 configuration tag. In the tag configuration, set the Event Settings Variable field to
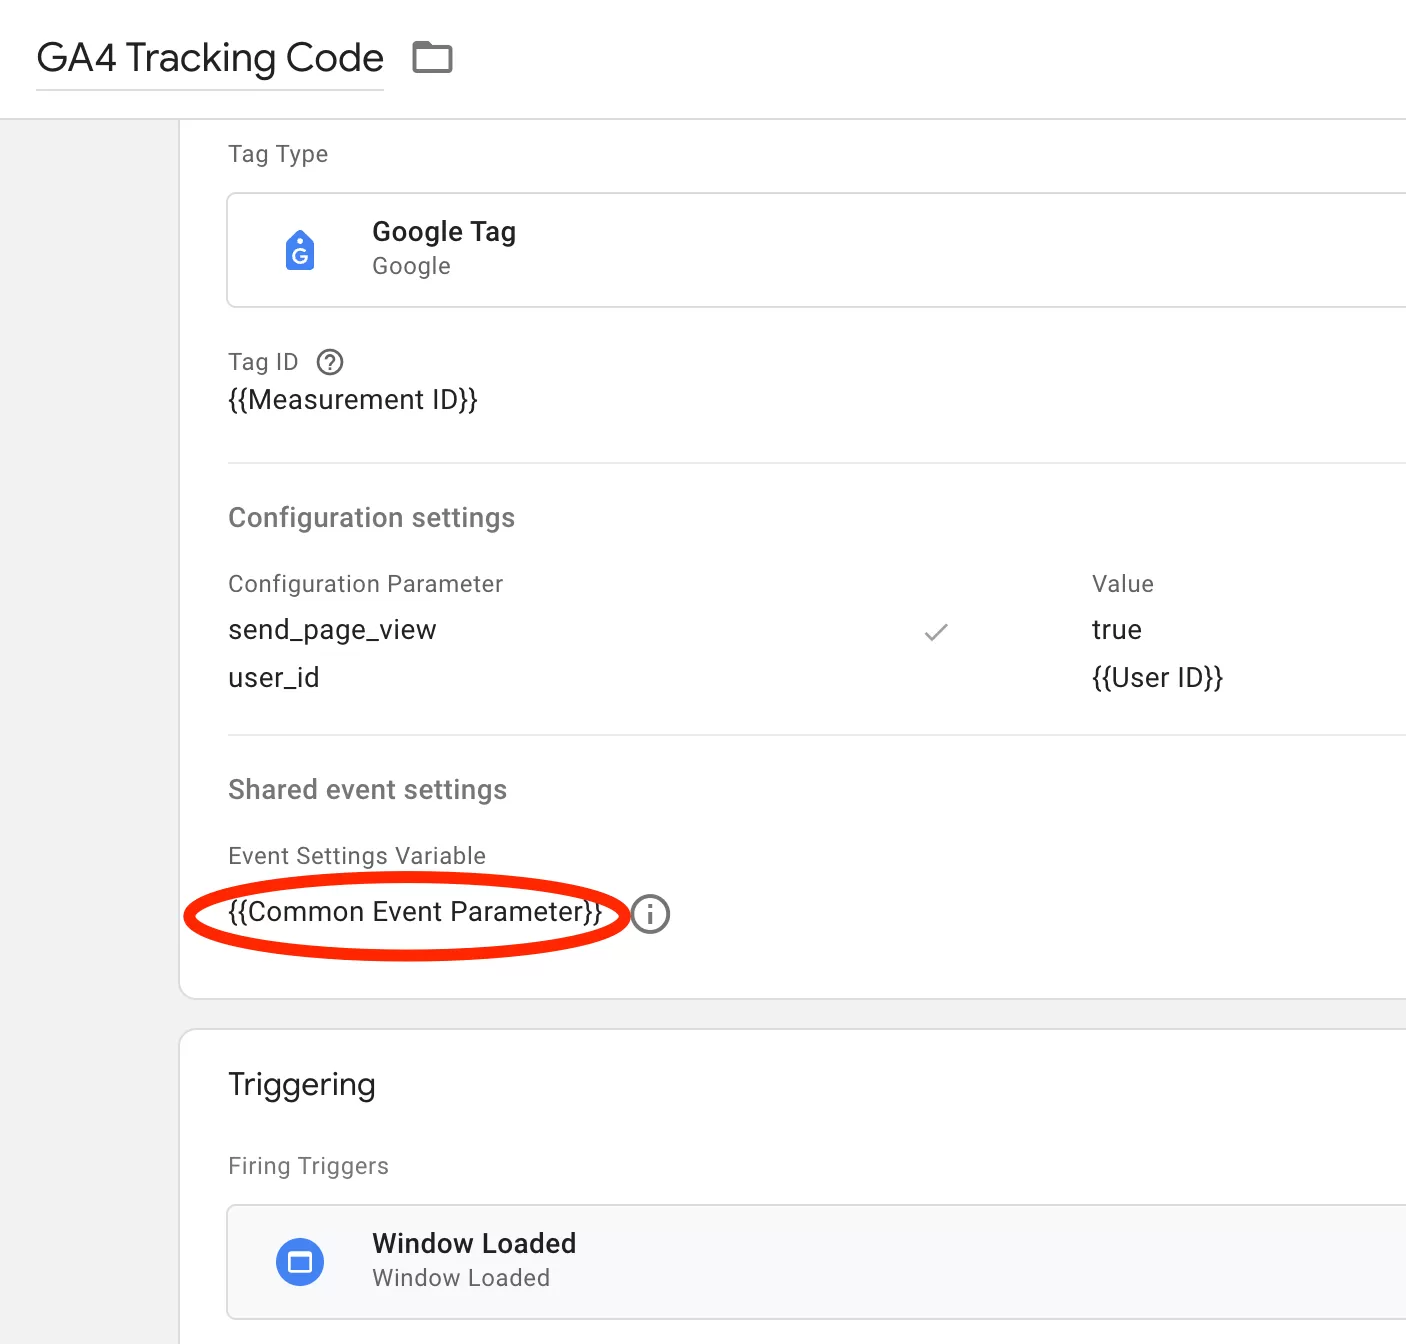
This ensures that the hashed User ID is sent as a user-scoped parameter on every event.
Step 3 : Preview and Release
Finally, Preview testing and release: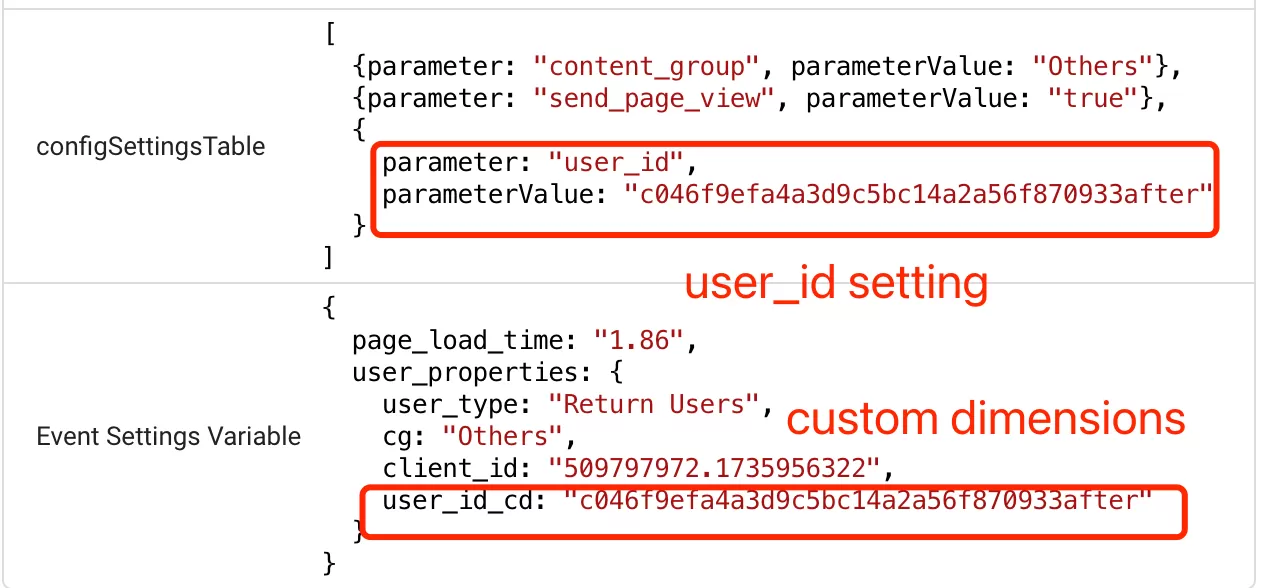
The test is as expected and can be released and data collected.
Step 4: Register the custom dimension in GA4
Even though the data is flowing from GTM, GA4 won’t show it in reports until you register it. This step is easy to miss.
In GA4,click「Admin」——「Custom definitions」——「Create custom dimension」, then do the following configuration:
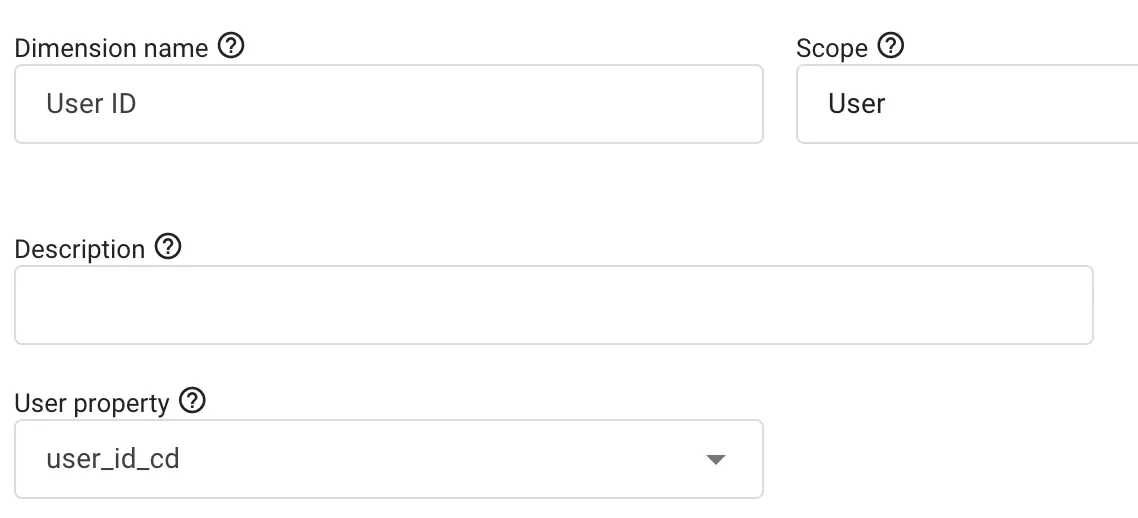
Save it. GA4 will start processing the data for this dimension.
Step 5 : Verify Data in GA4 Report
After 24 hours (GA4 needs some time to process), you should be able to see the User ID in your reports.
In GA4, click 「Explore」 – 「Free form」,configure the following:
- ROWS: User ID
- VALUES: Event count,Toatl users
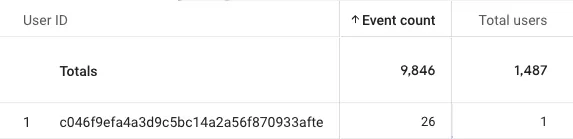
You should see the hashed values from your logged-in users show up. If you don’t see any data, double-check that:
- The Event Settings variable is correctly applied to your GA4 tag
- The custom dimension is registered with the exact parameter name (
user_id_cd) - You’ve collected data from a logged-in user after publishing
Final Words
Setting up User ID in GA4 involves a few moving parts — capturing the ID, hashing it, passing it through GTM, and registering the custom dimension — but each step is straightforward once you know what to do. The key takeaways:
- Always hash the User ID before sending it to GA4. PII is not allowed, and you don’t want to accidentally violate Google’s policies.
- Use a JavaScript Variable in GTM for reliability. It works regardless of cookie policies.
- The
user_idfield alone handles cross-device tracking. The custom dimension is only needed if you want to see User ID in reports. - Register the custom dimension in GA4 Admin or it won’t appear in Explore, no matter how perfectly you set it up in GTM.
Have you run into any issues setting up User ID — especially with hashing or cross-device testing? Drop a comment and share your experience.